- Learn about the project
- Set up the project in your computer
- Create a PR to the upstream repo
- Ensure TIC4001 iP increments have been done
- Add Increment:
A-Gradle - Apply a stricter coding standard
1 Learn about the project
- Read the following two sections, if you haven't done so already:
Admin iP - Overview
The TIC4002 iP is a continuation of the iP you did in TIC4001. How it differs:
- If some parts of the TIC4001 iP was not done well, you can strengthen them now.
- Some increments that were optional in TIC4001 iP will no longer be optional.
- Some new increments will be added.
- The bar you need to get full marks is higher.
As you know, the iP is based on the generic project called Project Duke.
Admin iP - Grading
Total: 20 marks
Implementation [10 marks]: Requirements to get full marks:
- Achieve more than 90% of all deliverables by the end.
- Requirements marked as optional or if-applicable are not counted when calculating the percentage of deliverables.
- When a requirement specifies a
minimalversion of it, simply reaching that minimal version of the requirement is enough for it to be counted for grading -- however, we recommend you to go beyond the minimal; the farther you go, the more practice you will get.
- The code quality meets the following conditions:
- Reasonable use of OOP e.g., at least some use of inheritance, code divided into classes in a sensible way
- No blatant violations of the coding standard (both Java and Git conventions)
- At least some errors are handled using exceptions
- At least half of public methods/classes have javadoc comments
- The code is neat e.g., no chunks of commented out code
- Reasonable use of SLAP e.g., no very-long methods or deeply nested code
Project Management [5 marks]: To get full marks, you should achieve,
- Submit some deliverables in at least 3 out of the 5 iP weeks (i.e., week 2 - week 6)
- Follow other requirements specified (e.g., how to use Git/Github for each increment) in at least 4 weeks
Documentation [5 marks]: To get full marks, you should achieve the following.
- The user guide: not hard to read, covers all features, no major formatting errors in the published view.
- The developer guide: Explains the design of the project using appropriate UML diagrams and descriptions.
You can monitor your iP progress (as detected by our scripts) in the iP Progress Dashboard page.
2 Set up the project in your computer
- We assume you still have the iP project set up that you used for TIC4001. If not, please set it up as explained in TIC4001 website.
3 Create a PR to the upstream repo
If you encounter technical problems, follow the guidelines given below in seeking help:
Admin Appendix D: Getting Help
Apdx C: FAQApdx E: Using GitHub
Apdx D: Getting Help
This guide is mostly about getting tech help, but it also applies to getting clarifications on module topics too. e.g. what is the difference between refactoring and rewriting?
Keep in mind that instructors don't have ready solutions to all technical problems. Unlike tutorial questions for which instructors have model solutions, given the complexity of industry tools we use (Gradle, GitHub, Git, ...) and the rapid pace they are updated, instructors don't have ready solutions to most technical problems you face in this module. The only realistic way to solve those problems at a large scale is crowd-sourcing i.e., someone else who faced a similar problem might know how to fix it.
What not to do:
- Send a help request to an instructor: When faced with a technical problem or a doubt about a concept, don't fire off an email lecturer/tutor immediately, unless it is something only the lecturer/tutor is supposed to know.
- Request to meet the instructor to solve the problem: That can only work if the person is supposed to know how to solve all technical problems, which is almost never the case.
What to do:
-
Double-check the given instructions: Often, technical problems arise due to deviations in how you perform a step or a difference in your environment.
-
Get your team to meet for a weekly work-together session. When you do module tasks together, it is easy to compare with each other and figure out what deviation is causing the problem. That is, crowd-source your team first.
-
Search: It is very likely the answer already exists somewhere in the cyberspace. Almost every programming-related question has been answered in places like stackoverflow. Don't give an opportunity for someone to ask you to STFW.
Pay attention to the error message you encounter. Sometimes it also contains hints as to how to fix the problem. Even if not, a web search on the error message is a good starting point.
-
Ask in the module forum:
-
Give full details of the problem Conversations via online forums take time. If you post everything that is relevant to your problem, your chances of getting an answer in the first try is higher. If others have to ask you more questions before they can help you, it will take longer. But this doesn't mean you dump too much information into the thread either.
- Give a meaningful title to the post. Be as specific as you can.
Badtesting problem
Goodruntest.bat fails with ClassNotFound error - Include full error message, screenshots, code snippets, stack traces, etc.
Note that it is better to give code in text form rather than as screenshots, to allow others to easily copy-paste the code in their reply.
You can use Markdown, and GFM syntax when posting in the forum. - If the problem is code-related, share the full code if possible (e.g., push the current state of the code to a branch in your fork and give the link to the branch). That gives a chance for someone to reproduce the state of your project in their computer. Sharing just a snippet of your choosing might not be enough as the problem may not be where you think it is.
- Give a meaningful title to the post. Be as specific as you can.
-
Avoid addressing the question to one person (e.g., the prof), unless really necessary. Doing so will discourage others from answering that question.
-
Isolate the problem. "My code doesn't work" isn't going to help even if you post the whole code. Others don't have time to go through all of your code. Isolate the part that doesn't work and strip it down to the bare minimum that is enough reproduce the error. Sometimes, this process actually helps you to figure out the problem yourself (have you heard about
Rubber Duck Debugging ?).How to isolate problematic code? Delete code (one bit at a time) that is confirmed as not related to the problem. Do that until you can still reproduce the problem with the least amount of code remaining.
-
Generalize the problem. "How to write tasks to a text file using Java" is too specific to what you are working on. You are more likely to find help if you post a thread called (or search for) "How to write to a file using Java".
-
Remember to thank those you try to help, and close the issue after the issue has been resolved.
-
Share the solution. If you eventually managed to solve the problem on your own, share the solution in the thread for the benefit of others, and give closure to those who tried to help you. Don't leave the thread hanging or close it with something like
Never mind. I figured it out. -
Don't hijack other threads: It is OK to chime in if you have the same problem as the Original PosterOP but don't ask a different (even if somewhat related) question in someone else's thread. That prevents the OP from closing the thread after the original question has been resolved. Instead, post your question as a separate thread.
-
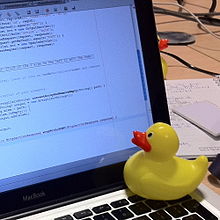
Rubber duck debugging is an informal term used in software engineering to refer to a method of debugging code. The name is a reference to a story in the book The Pragmatic Programmer in which a programmer would carry around a rubber duck and debug his code by forcing himself to explain it, line-by-line, to the duck.
[for more, see wikipedia entry]
- Ask the world using programming forums such as stackoverflow.
-
PLEASE search for existing answers before you post your question in those public forums; You don't want to appear as a 'clueless' or 'too lazy to do your research' person in a public forum.
Know what these stand for: RTFM, STFW, GIYF, LMGTFY
-
- Raise your question during a tutorial. Some questions can be discussed with the tutor and tutorial-mates.
What kind of questions are suitable to discuss with the tutor? Consider these two questions you might want to ask a tutor:
- Good This is how I understood/applied coupling. Is that correct? - Such questions are welcome. Reason:This question shows you have put in some effort to learn the topic and seeking further clarification from the tutor.
- Bad What is coupling? - Such questions are discouraged. Reason: This question implies you haven’t done what you could to learn the topic in concern.
- Ask the lecturer: Failing all above, you can talk to the lecturer before/after the lecture, or email the lecturer.
Some technical problems can take a long time to resolve. Therefore, plan ahead and schedule your work much earlier than the deadline.
Some problems might not get resolved at all; while waiting for a solution, explore alternatives and workarounds.
If your problem remains unsolved 24 hours after posting in the forum, please alert tic4002@comp.nus.edu.sg so that the teaching team can look into it.
Resources
- [lifehacker article] Google Tips and Tricks Every Student Should Know
- [Article] How To Ask Questions The Smart Way by Eric Steven Raymond
- Note that while you will be reusing the same i.e., the cloned repo in your computerlocal repo and the same i.e., the one you forked to your GitHub account last semesterforked remote repo, you will be using a new i.e., the repo you PR toupstream repo we have set up for this semester. As a result, you need to create a new PR from your fork to the new upstream repo, as given below.
- Create a
pull request (PR) from your fork to the upstream repo. Note the following:- Create the PR from the
masterbranch of your fork to themasterbranch of the upstream repo (https://github.com/nus-tic4002-AY2021S2/ip)Be careful to choose the new upstream repo to receive the PR. - Set the PR name as
[{Your name}] iPe.g.,[John Doe] iPIf you are reluctant to give full name, you may give the first half of your name only.
You may leave the description as empty. - If you created the PR correctly, it should appear in the list of PRs here.
- Steps for creating a PR is given in this textbook topic (steps 5 onwards):
- Create the PR from the
Textbook Git & GitHub → Creating PRs
Suppose you want to propose some changes to a GitHub repo (e.g., samplerepo-pr-practice) as a
A pull request (PR for short) is a mechanism for contributing code to a remote repo, i.e., "I'm requesting you to pull my proposed changes to your repo". For this to work, the two repos must have a shared history. The most common case is sending PRs from a fork to its upstream repo is a repo you forked fromupstream repo.
1. Fork the repo onto your GitHub account.
2. Clone it onto your computer.
3. Commit your changes e.g., add a new file with some contents and commit it.
- Option A - Commit changes to the
masterbranch - Option B - Commit to a new branch e.g., create a branch named
add-intro(remember to switch to themasterbranch before creating a new branch) and add your commit to it.
4. Push the branch you updated (i.e., master branch or the new branch) to your fork, as explained
Pushing a branch to a remote repo
Here's how to push a branch to a remote repo:
Here's how to push a branch named add-intro to your own fork of a repo named samplerepo-pr-practice:
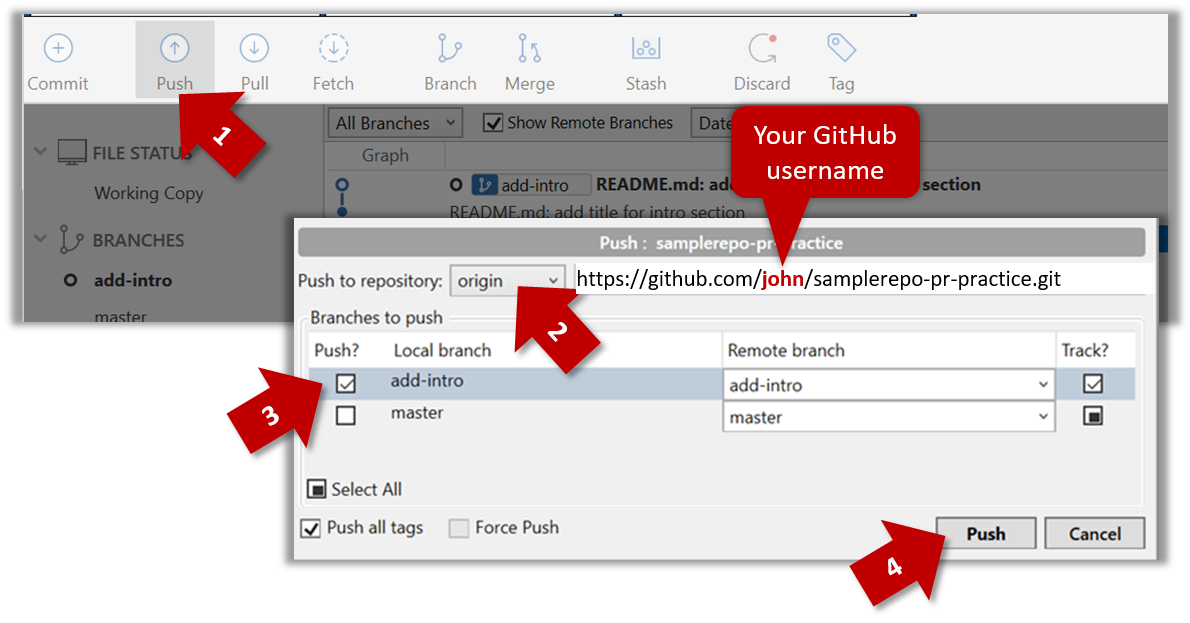
Normally: git push {remote repository} {branch}. Examples:
git push origin masterpushes themasterbranch to the repo namedorigin(i.e., the repo you cloned from)git push upstream-repo add-intropushes theadd-introbranch to the repo namedupstream-repo
If pushing a branch you created locally to the remote for the first time, add the -u flag to get the local branch to track the new upstream branch:
e.g., git push -u origin add-intro
See git-scm.com/docs/git-push for details of the push command.
5. Initiate the PR creation:
-
Go to your fork.
-
Click on the Pull requests tab followed by the New pull request button. This will bring you to the 'Comparing changes' page.
-
Set the appropriate target repo and the branch that should receive your PR, using the
base repositoryandbasedropdowns. e.g.,
base repository: se-edu/samplerepo-pr-practice base: masterNormally, the default value shown in the dropdown is what you want but in case your fork has e.g., the repo you forked from is also a fork of a another repo, which means both of those are considered upstream repos of your forkmultiple upstream repos, the default may not be what you want.
-
Indicate which repo:branch contains your proposed code, using the
head repositoryandcomparedropdowns. e.g.,
head repository: myrepo/samplerepo-pr-practice compare: master
6. Verify the proposed code: Verify that the diff view in the page shows the exact change you intend to propose. If it doesn't, commit the new code and push to the branchupdate the branch as necessary.
7. Submit the PR:
-
Click the Create pull request button.
-
Fill in the PR name and description e.g.,
Name:Add an introduction to the README.md
Description:Add some paragraph to the README.md to explain ... Also add a heading ... -
If you want to indicate that the PR you are about to create is 'still work in progress, not yet ready', click on the dropdown arrow in the Create pull request button and choose
Create draft pull requestoption. -
Click the Create pull request button to create the PR.
-
Go to the receiving repo to verify that your PR appears there in the
Pull requeststab.
The next step of the PR life cycle is the PR review. The members of the repo that received your PR can now review your proposed changes.
- If they like the changes, they can merge the changes to their repo, which also closes the PR automatically.
- If they don't like it at all, they can simply close the PR too i.e., they reject your proposed change.
- In most cases, they will add comments to the PR to suggest further changes. When that happens, GitHub will notify you.
You can update the PR along the way too. Suppose PR reviewers suggested a certain improvement to your proposed code. To update your PR as per the suggestion, you can simply modify the code in your local repo, commit the updated code to the same master branch, and push to your fork as you did earlier. The PR will auto-update accordingly.
Sending PRs using the master branch is less common than sending PRs using separate branches. For example, suppose you wanted to propose two bug fixes that are not related to each other. In that case, it is more appropriate to send two separate PRs so that each fix can be reviewed, refined, and merged independently. But if you send PRs using the master branch only, both fixes (and any other change you do in the master branch) will appear in the PRs you create from it.
To create another PR while the current PR is still under review, create a new branch (remember to switch back to the master branch first), add your new proposed change in that branch, and create a new PR following the steps given above.
It is possible to create PRs within the same repo e.g., you can create a PR from branch feature-x to the master branch, within the same repo. Doing so will allow the code to be reviewed by other developers (using PR review mechanism) before it is merged.
Resources
Pull Requests is a mechanism for offering code to a repository e.g., a bug fix or a new feature. PRs allow developers to review, discuss, and refine proposed code changes before incorporating (i.e., merging) the new code to the repository.
Resources:
4 Ensure TIC4001 iP increments have been done
- Ensure that following increments (that were due in TIC4001) have been done. Improve their implementation, if the current implementation is weak (in your own opinion). For example, you can add more JavaDoc comments or JUnit tests even if the current code has them already.
Level1: Greet, Echo, Exit Level 1. Greet, Echo, Exit
Implement a skeletal version of Duke that starts by greeting the user, simply echos commands entered by the user, and exits when the user types bye.
Example:
    ____________________________________________________________
     Hello! I'm Duke
     What can I do for you?
    ____________________________________________________________

list
    ____________________________________________________________
     list
    ____________________________________________________________

blah
    ____________________________________________________________
     blah
    ____________________________________________________________

bye
    ____________________________________________________________
     Bye. Hope to see you again soon!
    ____________________________________________________________
- The indentation and horizontal lines are optional.
You are strongly encouraged to customize the chatbot name, command/display formats, and even the personality of the chatbot to make your chatbot unique.
Level2: Add, List Level 2. Add, List
Add the ability to store whatever text entered by the user and display them back to the user when requested.
Example:
    ____________________________________________________________
     Hello! I'm Duke
     What can I do for you?
    ____________________________________________________________

read book
    ____________________________________________________________
     added: read book
    ____________________________________________________________

return book
    ____________________________________________________________
     added: return book
    ____________________________________________________________

list
    ____________________________________________________________
     1. read book
     2. return book
    ____________________________________________________________
bye
    ____________________________________________________________
     Bye. Hope to see you again soon!
    ____________________________________________________________
- There is no need to save the data to the hard disk.
- Assume there will be no more than 100 tasks. If you wish, you may use a fixed size array (e.g.,
String[100]) to store the items.
Level3: Mark as Done Level 3. Mark as Done
Add the ability to mark tasks as done.
list
    ____________________________________________________________
     Here are the tasks in your list:
     1.[X] read book
     2.[ ] return book
     3.[ ] buy bread
    ____________________________________________________________

done 2
    ____________________________________________________________
     Nice! I've marked this task as done:
       [X] return book
    ____________________________________________________________
When implementing this feature, you are also recommended to implement the following extension:
Extension: A-Classes
While it is possible to represent a task list as a multi-dimensional array containing String, int, boolean etc.primitive values, the more natural approach is to use a Task class to represent tasks.
Partial solution
public class Task {
    protected String description;
    protected boolean isDone;

    public Task(String description) {
        this.description = description;
        this.isDone = false;
    }

    public String getStatusIcon() {
        return (isDone ? "X" : " "); // mark done task with X
    }

    //...
}
Task t = new Task("read book");
t.markAsDone();
Level4: ToDo, Event, Deadline Level 4. ToDos, Events, Deadlines
Add support for tracking three types of tasks:
- ToDos: tasks without any date/time attached to it e.g., visit new theme park
- Deadlines: tasks that need to be done before a specific date/time e.g., submit report by 11/10/2019 5pm
- Events: tasks that start at a specific time and ends at a specific time e.g., team project meeting on 2/10/2019 2-4pm
Example:
todo borrow book
    ____________________________________________________________
     Got it. I've added this task:
       [T][ ] borrow book
     Now you have 5 tasks in the list.
    ____________________________________________________________

list
    ____________________________________________________________
     Here are the tasks in your list:
     1.[T][X] read book
     2.[D][ ] return book (by: June 6th)
     3.[E][ ] project meeting (at: Aug 6th 2-4pm)
     4.[T][X] join sports club
     5.[T][ ] borrow book
    ____________________________________________________________

deadline return book /by Sunday
    ____________________________________________________________
     Got it. I've added this task:
       [D][ ] return book (by: Sunday)
     Now you have 6 tasks in the list.
    ____________________________________________________________

event project meeting /at Mon 2-4pm
    ____________________________________________________________
     Got it. I've added this task:
       [E][ ] project meeting (at: Mon 2-4pm)
     Now you have 7 tasks in the list.
    ____________________________________________________________
At this point, dates/times can be treated as strings; there is no need to convert them to actual dates/times.
Example:
deadline do homework /by no idea :-p
    ____________________________________________________________
     Got it. I've added this task:
       [D][ ] do homework (by: no idea :-p)
     Now you have 6 tasks in the list.
    ____________________________________________________________
When implementing this feature, you are also recommended to implement the following extension:
Extension: A-Inheritance
As there are multiple types of tasks that have some similarity between them, you can implement classes Todo, Deadline and Event classes to inherit from a Task class.
Furthermore, use polymorphism to store all tasks in a data structure containing Task objects e.g., Task[100].
Partial solution
public class Deadline extends Task {

    protected String by;

    public Deadline(String description, String by) {
        super(description);
        this.by = by;
    }

    @Override
    public String toString() {
        return "[D]" + super.toString() + " (by: " + by + ")";
    }
}
Task[] tasks = new Task[100];
task[0] = new Deadline("return book", "Monday");
Level5: Handle Errors Level 5. Handle Errors
Teach Duke to deal with errors such as incorrect inputs entered by the user.
Example:
todo
    ____________________________________________________________
     ☹ OOPS!!! The description of a todo cannot be empty.
    ____________________________________________________________

blah
    ____________________________________________________________
     ☹ OOPS!!! I'm sorry, but I don't know what that means :-(
    ____________________________________________________________
When implementing this feature, you are also recommended to implement the following extension:
- Minimal: handle at least the two types of errors shown in the example above.
- Stretch goal: handle all possible errors in the current version. As you evolve Duke, continue to handle errors related to the new features added.
Level6: Delete Level 6. Delete
Add support for deleting tasks from the list.
Example:
list
    ____________________________________________________________
     Here are the tasks in your list:
     1.[T][X] read book
     2.[D][X] return book (by: June 6th)
     3.[E][ ] project meeting (at: Aug 6th 2-4pm)
     4.[T][X] join sports club
     5.[T][ ] borrow book
    ____________________________________________________________

delete 3
    ____________________________________________________________
     Noted. I've removed this task:
       [E][ ] project meeting (at: Aug 6th 2-4pm)
     Now you have 4 tasks in the list.
    ____________________________________________________________
Level7: Save Level 7. Save
Save the tasks in the hard disk automatically whenever the task list changes. Load the data from the hard disk when Duke starts up. You may hard-code the file name and location e.g., [project_root]/data/duke.txt
The format of the file is up to you. Example:
T | 1 | read book
D | 0 | return book | June 6th
E | 0 | project meeting | Aug 6th 2-4pm
T | 1 | join sports club
If you use file paths in your code,
- remember to use relative paths rather than absolute paths such as
C:\data. If not, your app can cause unpredictable results when used in another computer. - remember to specify file paths in an OS-independent way. If not, your app might not work when used on a different OS.
Your code must i.e., if the file is missing, your code must creat ithandle the case where the data file doesn't exist at the start. Reason: when someone else takes your Duke and runs it for the first time, the required file might not exist in their computer. Similarly, if you expect the data file to be in as specific folder (e.g., ./data/), you must also handle the folder-does-not-exist-yet case.
Level9: Find Level 9. Find
Give users a way to find a task by searching for a keyword.
Example:
find book
    ____________________________________________________________
     Here are the matching tasks in your list:
     1.[T][X] read book
     2.[D][X] return book (by: June 6th)
    ____________________________________________________________
A-MoreOOP: Use more OOP Refactor the code to extract out closely related code as classes.
- Minimal: Extract the following classes:
Ui: deals with interactions with the userStorage: deals with loading tasks from the file and saving tasks in the fileParser: deals with making sense of the user commandTaskList: contains the task list e.g., it has operations to add/delete tasks in the list
For example, the code of the main class could look like this:
public class Duke {

    private Storage storage;
    private TaskList tasks;
    private Ui ui;

    public Duke(String filePath) {
        ui = new Ui();
        storage = new Storage(filePath);
        try {
            tasks = new TaskList(storage.load());
        } catch (DukeException e) {
            ui.showLoadingError();
            tasks = new TaskList();
        }
    }

    public void run() {
        //...
    }

    public static void main(String[] args) {
        new Duke("data/tasks.txt").run();
    }
}
- Stretch Goal: Consider extracting more classes. e.g.,
*Commandclasses (i.e.,AddCommand,DeleteCommand,ExitCommandetc.) that inherits from an abstractCommandclass, so that you can write the main logic of the App as follows:public void run() { ui.showWelcome(); boolean isExit = false; while (!isExit) { try { String fullCommand = ui.readCommand(); ui.showLine(); // show the divider line ("_______") Command c = Parser.parse(fullCommand); c.execute(tasks, ui, storage); isExit = c.isExit(); } catch (DukeException e) { ui.showError(e.getMessage()); } finally { ui.showLine(); } } }
A-JUnit: Add JUnit Tests Add JUnit tests to test the behavior of the code.
Requirements:
- Minimum: More than two test methods, preferably targeting more than one class (if you have multiple classes)
- Stretch goal: test methods to target all public methods of all classes
Refer to the JUnit tutorial @se-edu/guides to find how to use JUnit.
5 Add Increment: A-Gradle
- As before, after an increment has been completed, tag the commit using the increment ID (e.g.,
A-Gradlein this case) and push that tag to your fork. - You are recommended to do each new increment in a separate branch.
- If you have done the increment in the previous semester already and the tag has been pushed to the repo, no further action needed.
A-Gradle: Use Gradle Use Gradle to automate some of the build tasks of the project.
Refer to the Gradle tutorial @SE-EDU to learn how to use Gradle.
Gradle support is provided as a separate branch (named add-gradle-support) in the Duke repo. Therefore, you can follow the scenario 2 in the above guide.
- Minimal: Set up gradle so that you can build and run Duke using gradle.
- Recommended: Set up gradle to run unit tests.
- Stretch Goal: Use gradle to automate more things in your project.
6 Apply a stricter coding standard
In TIC4001, you applied only the basic rules of the Java coding standard. TIC4002 raises the bar to cover intermediate rules as well. Update your code to comply with that new bar.
Tag to apply to the commit: A-StricterCodingStandard.
See the Standards/conventions page for more info.
Implementing the following increment (optional) can be help with the above.
A-CheckStyle: Use CheckStyle Use checkStyle to detect coding style violations.
Refer the tutorial Using Checkstyle @SE-EDU/guides to learn how to use Checkstyle.