This site is from a past semester! The current version will be here when the new semester starts.
TIC4002 2021 Jan-May
  • Full Timeline
  • Week 1 [Mon, Jan 11th]
  • Week 2 [Fri, Jan 15th]
  • Week 3 [Fri, Jan 22nd]
  • Week 4 [Fri, Jan 29th]
  • Week 5 [Fri, Feb 5th]
  • Week 6 [Fri, Feb 12th]
  • Week 7 [Fri, Feb 19th]
  • Week 8 [Fri, Mar 5th]
  • Week 9 [Fri, Mar 12th]
  • Week 10 [Fri, Mar 19th]
  • Week 11 [Fri, Mar 26th]
  • Week 12 [Fri, Apr 2nd]
  • Week 13 [Fri, Apr 9th]
  • Textbook
  • Admin Info
  • Dashboards
  •  Individual Project (iP):
  • Individual Project Info
  • iP Upstream Repo
  • iP Showcase
  • iP Code Dashboard
  • iP Progress Dashboard

  •  Team Project (tP):
  • Team Project Info
  • tP Upstream Repo (AB3)
  • Team List
  • tP Code Dashboard
  • tP Progress Dashboard
  • Report Bugs
  • Forum
  • Instructors
  • Announcements
  • Files (handouts, submissions etc.)
  • MS Teams link
  • Java Coding Standard
  • Git Conventions
  • Participation Dashboard
  • Week 1 [Mon, Jan 11th] - Admin Info

    Admin info relevant to the week will appear in this tab.

    1. Set up the tools before the lecture
    2. Learn about the module
    3. Attend the first lecture

    1 Set up the tools before the lecture

    • Follow the Preparation instructions of the following tools.

    The tools in the following panels are the same as what you used in TIC4001.

    The main language used in this module is Java. You should use Java for all programming activities, the project, and exam answers.

    Preparation:

    We require you to use Java 11 (the Oracle version or the OpenJDK version) for all module work. It is your duty to ensure the code you write (and executables you produce) are compatible with that version of Java. Any incompatibilities will be considered as bugs.

    Tool: GitHub (for code hosting)

    You are required to use GitHub as the hosting and collaboration platform of your project (i.e., to hold the Code repository, Issue Tracker, etc.).

    Preparation:

    Create a GitHub account (if you don't have one yet), as explained in the panel below.

    Create a personal GitHub account if you don't have one yet.

    1. You are advised to choose a sensible GitHub username as you are likely to use it for years to come in professional contexts e.g., in job applications.

    2. Strongly recommended: Complete your GitHub profile. In particular,

      • Specify your full name.
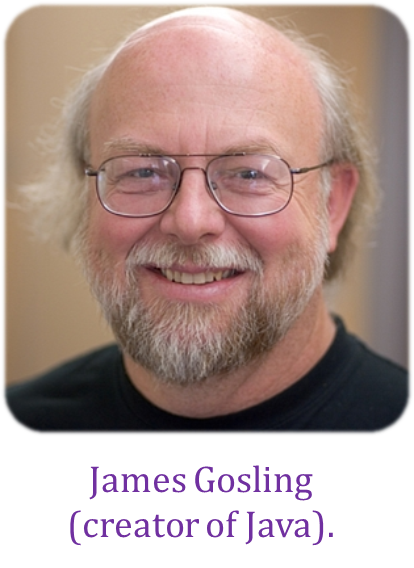
      • Upload a profile photo that matches our requirements.

      The GitHub profile is useful for the tutors and classmates to identify you. If you are reluctant to share your info in your long-term GitHub account, you can remove those details after the module is over or create a separate GitHub account just for the module.

    3. You are discouraged from changing your GitHub username during the semester/exam/grading period as it can cause our auto-grading scripts to miss your GitHub activities. If you do change your GitHub username during that period, please let us know immediately.


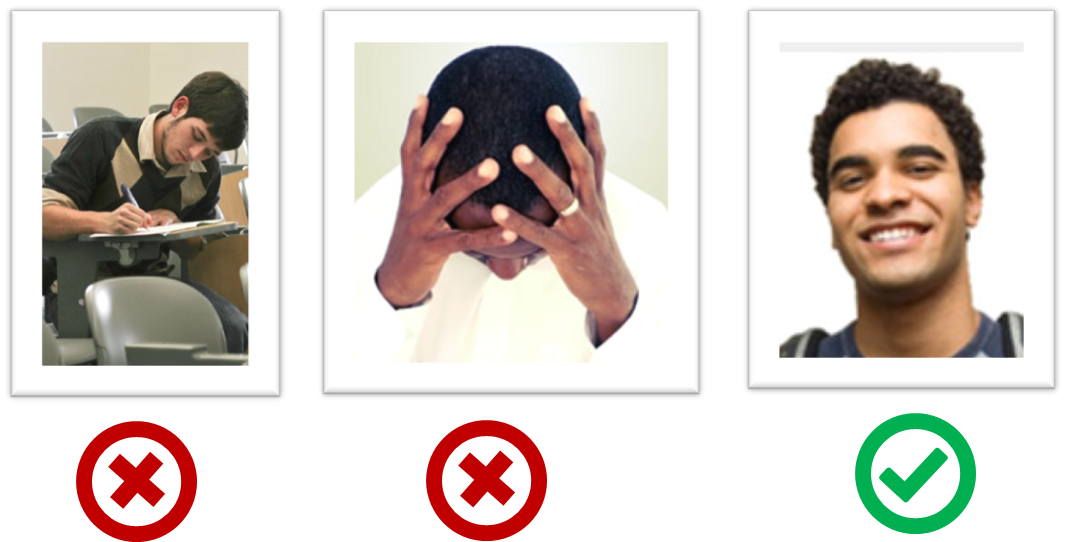
    The purpose of the profile photo is for the reader to identify you. Therefore, choose a recent individual photo showing your face clearly (i.e., not too small) -- somewhat similar to a passport photo. Given below are some examples of good and bad profile photos.

    If you are uncomfortable posting your photo due to security reasons, you can post a lower resolution image so that it is hard for someone to misuse that image for fraudulent purposes. If you are concerned about privacy, you may use a placeholder image in place of the photo in module-related documents that are publicly visible.

    More info: See Appendix E - Using GitHub.

    Tool: Git (for revision control)

    You are required to use Git. Other revision control software are not allowed. The recommended GUI client for Git is SourceTree, but you may use any other, or none.

    Preparation:

    Install Git and a Git GUI client on your computer.
    SourceTree comes bundled with Git i.e., if you install SourceTree, you get both Git and a GUI client in one shot. If you are already comfortable using Git command line, you need not install/use a GUI client.

    Set Git user.name: We use various tools to analyze your code. For us to be able to identify your commits, we encourage you to set your Git user.name in all computers you use to a sensible string that uniquely identifies you. For example, you can set it to your GitHub username or your full name. If this user name is not set properly or if you use multiple usernames for Git, our grading scripts might miss some of your work.

    After installing Git in a computer, you can set the Git username as follows:

    1. Open a command window that can run Git commands (e.g., Git bash window)
    2. Run the command git config --global user.name YOUR_GITHUB_USERNAME (omit the --global flag to limit the setting to the current repo only)
      e.g., git config --global user.name JohnDoe

    More info about setting Git username is here.

    Tool: Intellij IDE

    You are recommended to use Intellij IDEA for module-related programming work. While the use of Intellij is not compulsory, note that module materials are optimized for Intellij. Use other IDEs at your own risk.

    Preparation:

    • Install the IDE in your computer. You may use the Intellij community edition (free) or the ultimate edition (free for students).
    • If you have an older version of the IDE, we recommend updating to the latest version.

    The tools in the following panels differ slightly from TIC4001.

    Tools: for communication

    Forum (for longer-running discussions)
    • The preferred channels for module-related communication is the forum on GitHub https://github.com/nus-tic4002-AY2021S2/forum/issues (not the LumiNUS forum)
    • When communicating with instructors, use the forum. Use private channels (e.g., emails, private messages, face-to-face, private chat groups) only when the forum is not suitable. Rationale: 1. More classmates can benefit from the discussions, 2. It is also safer because the prof can monitor information you receive for accuracy.
    • You are encouraged to help others in the forum (e.g., share tips, help with technical problems). We consider such sharing when giving out A+ grades and when recruiting tutors.

    Preparation:

    We encourage all to watch the forum to get alerts when new issues/comments are posted

    MS Teams (for quick chats, in-lecture consultations)
    • Use MS Teams for short chats.
    • Install MST in your computer. Installation and login instructions are here. Remember to login using your NUSNET account.

    2 Learn about the module

    • Read the following admin info about the module.

    The info in the following panels are as the same as TIC4001.

    Here are some important expectations of the module from you.

    Workload

    As 100% of this module is based on CA (see grade breakdown), it can appear to be heavy. However, it is not expected that you will spend more time on this module than its e.g., if this module is core for you, it should not take more time than other core modules at the same level in your programpeer modules.

    • Note that the module contains more things than a typical students can do, in order to provide enough things for even the strongest students to learn as much as they wish to.
    • This means it is perfectly OK if you don't have time to learn everything the module offers. Control your workload based on time you spend for the module in a week e.g., 1-1.5 days per week.
    • We have provided a star rating system to guide you when prioritizing which things to do.

    Star Rating System

    We use a star rating system to indicate the importance of module components. Start with things that are rated one-star and progress to things with more stars. Things rated four stars are optional.

    Star ratings for topics (and textbook sections):

    • One-star topics are essential to keep up with the module. We recommend you to learn these topics if you want to pass the module (i.e. up to a C grade).
    • Two-stars topics can get you up to a B+.
    • Three-stars topics can get you up to an A.
    • Four-stars topics : OPTIONAL can push you beyond the limits of the module, and help you get into a level above those who merely limit themselves to the topics of the module. They are not examinable here means can affect the grade during evaluation of various components, not necessarily limited to the final exam (if any)examinable.
    • Topics marked with two icons e.g., : , : , : are relevant topics you are expected to have learned in prerequisite modules. They are given for reference, but are examinable. The number of stars indicates the progression of topics, similar to the star rating system above i.e., one-star prerequisite topics are the most basic and the most important. four-star pre-requisite topics can be ignored without affecting CAP.

    Star ratings for other things e.g., admin info sections:

    • The module uses a similar star rating system to indicate the importance of other info in this website. i.e., information rated as one-star are the most essential. Info rated four stars are non-essential and can be ignored without affecting your ability to follow the module.

    The Schedule page is your main source of information for TIC4002. You will need to refer to it weekly. For an overview of the full schedule, refer to the Full Timeline page.

    More details for the upcoming weeks will be added as the weeks progress. In general, information given for more than 1 week into the future should be treated as tentative.

    Browser compatibility

    Most of this will work on most mainstream Browsers, but embedded slides are best viewed using Chrome.

    Information layers

    This book tries to layer information so that readers can decide to omit less important layers if they wish to.

    More important information are in bold or highlighted while less important information are dimmed or in collapsed panels such as the below.

    Less important info

    Less important info

    Less important info

    Tabs indicate alternative formats of the same content (e.g. video vs text). You can choose the one you like and ignore the other tabs.

    Some textual description of X

    Video describing X

    Dotted underlines indicate some additional infotool tips (activated by hovering over it) and dashed underlines indicate modal windows (activated by clicking) containing additional information.

    Tooltip Example
    Additional information
    Additional information

    This website uses a star rating system to indicate the priority level of contents.

    Star Rating System

    We use a star rating system to indicate the importance of module components. Start with things that are rated one-star and progress to things with more stars. Things rated four stars are optional.

    Star ratings for topics (and textbook sections):

    • One-star topics are essential to keep up with the module. We recommend you to learn these topics if you want to pass the module (i.e. up to a C grade).
    • Two-stars topics can get you up to a B+.
    • Three-stars topics can get you up to an A.
    • Four-stars topics : OPTIONAL can push you beyond the limits of the module, and help you get into a level above those who merely limit themselves to the topics of the module. They are not examinable here means can affect the grade during evaluation of various components, not necessarily limited to the final exam (if any)examinable.
    • Topics marked with two icons e.g., : , : , : are relevant topics you are expected to have learned in prerequisite modules. They are given for reference, but are examinable. The number of stars indicates the progression of topics, similar to the star rating system above i.e., one-star prerequisite topics are the most basic and the most important. four-star pre-requisite topics can be ignored without affecting CAP.

    Star ratings for other things e.g., admin info sections:

    • The module uses a similar star rating system to indicate the importance of other info in this website. i.e., information rated as one-star are the most essential. Info rated four stars are non-essential and can be ignored without affecting your ability to follow the module.

    Conventions used

    Shorthand headings

    Meaning of some shortened headings:

    • What : the meaning of the concept in concern (example)

    Implementation → Refactoring →

    What

    The first version of the code you write may not be of production quality. It is OK to first concentrate on making the code work, rather than worry over the quality of the code, as long as you improve the quality later. This process of improving a program's internal structure in small steps without modifying its external behavior is called refactoring.

    • Refactoring is not rewriting: Discarding poorly-written code entirely and re-writing it from scratch is not refactoring because refactoring needs to be done in small steps.
    • Refactoring is not bug fixing: By definition, refactoring is different from bug fixing or any other modifications that alter the external behavior (e.g. adding a feature) of the component in concern.

    Improving code structure can have many secondary benefits: e.g.

    • hidden bugs become easier to spot
    • improve performance (sometimes, simpler code runs faster than complex code because simpler code is easier for the compiler to optimize).

    Given below are two common refactorings (more).

    Refactoring Name: Consolidate Duplicate Conditional Fragments

    Situation: The same fragment of code is in all branches of a conditional expression.

    Method: Move it outside of the expression.

    Example:

    if (isSpecialDeal()) {
        total = price * 0.95;
        send();
    } else {
        total = price * 0.98;
        send();
    }
    
     → 
    if (isSpecialDeal()) {
        total = price * 0.95;
    } else {
        total = price * 0.98;
    }
    send();
    
    
    if is_special_deal:
        total = price * 0.95
        send()
    else:
        total = price * 0.98
        send()
    
     → 
    if is_special_deal:
        total = price * 0.95
    else:
        total = price * 0.98
        
    send()
    

    Refactoring Name: Extract Method

    Situation: You have a code fragment that can be grouped together.

    Method: Turn the fragment into a method whose name explains the purpose of the method.

    Example:

    void printOwing() {
        printBanner();
    
        // print details
        System.out.println("name:	" + name);
        System.out.println("amount	" + getOutstanding());
    }
    

    void printOwing() {
        printBanner();
        printDetails(getOutstanding());
    }
    
    void printDetails(double outstanding) {
        System.out.println("name:	" + name);
        System.out.println("amount	" + outstanding);
    }
    
    def print_owing():
        print_banner()
    
        # print details
        print("name:	" + name)
        print("amount	" + get_outstanding())
    

    def print_owing():
        print_banner()
        print_details(get_outstanding())
    
    def print_details(amount):
        print("name:	" + name)
        print("amount	" + amount)
    

    Some IDEs have builtin support for basic refactorings such as automatically renaming a variable/method/class in all places it has been used.

    Refactoring, even if done with the aid of an IDE, may still result in regressions. Therefore, each small refactoring should be followed by regression testing.

    Choose the correct statements.

    • a. Refactoring can improve understandability
    • b. Refactoring can uncover bugs
    • c. Refactoring can result in better performance
    • d. Refactoring can change the number of methods/classes

    a, b, c, d

    Explanation:

    • (a, b, c) Although the primary aim of refactoring is to improve the internal code structure, there are other secondary benefits.
    • (d) Some refactorings result in adding/removing methods/classes.

    Do you agree with the following statement? Justify your answer.

    Statement: Whenever you refactor code to fix bugs, you need not do regression testing if the bug fix was minor.

    There are two flaws in the given statement.

    DISAGREE.

    1. Even a minor change can have major repercussions on the system. You MUST do regression testing after each change, no matter how minor it is.
    2. Fixing bugs is technically not refactoring.

    Explain what refactoring is and why it is not the same as rewriting, bug fixing, or adding features.

    • Why : the motivation behind the concept in concern (example)

    Implementation → Documentation → Guidelines → Describe Top-Down →

    Why

    The main advantage of the top-down approach is that the document is structured like an upside down tree (root at the top) and the reader can travel down a path she is interested in until she reaches the component she is interested to learn in-depth, without having to read the entire document or understand the whole system.

    • How : the usage of the concept in concern (example)

    Implementation → Refactoring →

    How

    Given below are some more commonly used refactorings. A more comprehensive list is available at refactoring-catalog.

    1. Consolidate Conditional Expression
    2. Decompose Conditional
    3. Inline Method
    4. Remove Double Negative
    5. Replace Magic Literal
    6. Replace Nested Conditional with Guard Clauses
    7. Replace Parameter with Explicit Methods
    8. Reverse Conditional
    9. Split Loop
    10. Split Temporary Variable
    • When : the pros and cons of the concept in concern, when to use the concept (example)

    Implementation → Refactoring →

    When

    You know that it is important to refactor frequently so as to avoid the accumulation of ‘messy’ code which might get out of control. But how much refactoring is too much refactoring? It is too much refactoring when the benefits no longer justify the cost. The costs and the benefits depend on the context. That is why some refactorings are ‘opposites’ of each other (e.g. extract method vs inline method).

    ‘Extract method’ and ‘Inline method’ refactorings

    a

    Meaning of icons

    : additional info
    : warning
    : positive message
    or : important message
    : error or danger to avoid
    or : tip
    : definition or topic
    extra : tangential info, can be ignored if not interested
    : Ctrl+Click to open the LO in new window/tab.
    : learning outcomes
    : prerequisite learning outcome
    : examples
    : resources
    : exercises
    : printable version
    : preview/more info
    : video
    >_ : a command to be run in a terminal
    : textual description
    : slides
    : output produced by running code
    question without answer
    question with answer

    : tasks to do
    : lecture
    : tutorial
    : evidence you can use to prove you have achieved a learning outcome
    ⏰ : deadline

    Searching for keywords

    Use the search box in the top navigation bar to search for keywords in the website pages. If you cannot find the content related to a keyword, let us know by posting in the forum so that we can add the missing keyword to our search index.

    Saving as PDF files

    Follow this guide @SE-EDU/guides.

    Printing Textbook Content

    Printer-friendly version (indicated by icon) have been provided for each chapter and the whole book. You can use them for saving as pdf files or printing.

    Making this Website Better

    This website was generated using the MarkBind software developed at NUS. We welcome bug reports, suggestions, and contributions, to be submitted at the website issue tracker.

    The info in the following panels differs from TIC4001.

    A Software Engineering practicum module focusing on starting with an existing code basebrownfield team projects...

    TIC4002 builds on Software Engineering Practicum ITIC4001 to strengthen your practical SE skills. The focus will be on getting some hands on practice in working with an existing code base.

    • On the theory side, this module relies mostly on the theory covered in TIC2002 and TIC4001, but it will also cover a small number of new topics to help you with the project. As before, this module is supported by a customized online textbook Software Engineering for Self-Directed Learners, integrated into this module website.

    • The practice side, you will first continue to ramp up your technical skills by improving on the individual project that you did in TIC4001.
      Then, you will move to a team project in which you will take over an existing project AddressBook-Level3 (AB3) -- a relatively small yet non-trivial (6 KLoC) generic product -- and enhance it into a better product or evolve it into a different product.

    3 Attend the first lecture

    • Attend the first lecture on Fri, Jan 15th (compulsory).

    Timing/venue:

    The lecture+tutorial slot (Friday 6.30pm-9.30pm) will be repurposed as follows, due to this being a 100% project module:

    • 6.30-7pm: No formal activities. Work with team members and consult instructors (using the MS Teams app) if you need help with the previous week's tasks.
    • 7-7.30pm: Weekly briefing.
    • 7-30-9.30pm:
      • Do the lecture activities (if any) or work with team members to do weekly project activities.
      • The tutor will observe or get involved in your team's work as necessary.
      • You may approach instructors (using the MS Teams app) for help during this period.
      • From week 3, we'll be scheduling team meetings during this period, for the team supervisor to discuss the team project progress with you.

    Mode:

    • Will be done using Zoom. More information coming soon.
    • Some topics come with pre-recorded lecture videos.
    Tips for watching lecture videos
    • You can watch video lectures at faster speeds (x1.25 or even x1.5) to save time.
    • Lecture videos require NUSNET login.

    Attendance: Attendance for the first lecture is compulsory.

    Handouts: There are no handouts. All learning materials are organized around topics, are given in Web format, can be found in the Textbook section (organized by topics), and are also embedded in the Schedule page (organized in the order they are covered).

    Slides: Our lecture slides are not suited for printing or to be used as a reference during the lecture/exams. They are only an aid for lecture delivery. Slides will be uploaded to LumiNUS after the lecture.

    + Other info relevant to this week:

    Admin tP: Forming Teams


    [Picture: The team that was at the top of early Google]

    When to form teams

    • Teams forming will be done during the first lecture.

    Team size

    • The default team size is four.

    Team composition

    • There are two options:
      Option 1: Everyone stays with their TIC4001 team for TIC4002 as well.
      Option 2: No one is allowed to have their TIC4001 team members in the TIC4002 team.

    • One of the two options will be chosen based on a vote. The selection option will apply to the whole class. A mixture is not possible due to the small class size.

    • We may modify teams when circumstances call for it. There is no avenue for you to object. Staying with your preferred team is not guaranteed.

    Admin Textbooks

    This module is supported by a customized online textbook Software Engineering for Self-Directed Learners (TIC4002 edition), integrated into this module website. While it is in a dynamic Web page format, there is a way to save the main text as pdf files.

    Saving as PDF files

    Follow this guide @SE-EDU/guides.

    Admin Grade Breakdown

    To receive full 5 marks allocated for participation, meet the criteria A, B, and C.

    A Earned more than half of weekly participation points in at least 10 weeks.

    • Weekly quiz(es):
      • Quizzes open around the lecture time and stay open until the next lecture starts.
      • When awarding participation points for quizzes, we look for two conditions:
        • Condition 1: submitted early i.e., within four days of the lecture i.e., lecture day + three more days (reason: to encourage learning the weekly topics before doing the weekly tasks)
        • Condition 2: answered correctly i.e., least 70% of the answers are correct (reason: to discourage random answers)
      • You earn:
        • 3 points if you satisfy both conditions.
        • 2 points if only one of the conditions is satisfied.
        • 1 point if submitted but both conditions are not satisfied.
    • Other weekly activities:
      • There could be other activities related to the lecture, or the administration of the module.
      • Refer the activity description for evaluation criteria.

    B Received good peer evaluations

    • -1 for each professional conduct criterion in which you score below average (based on the average of ratings received).

    Q The team members' conduct in the project and during tutorials,

    • Evaluated based on the following criteria, on a scale Poor/Below Average/Average/Good/Excellent:

    Peer Evaluation Criteria: Professional Conduct

    • Professional Communication :
      • Communicates sufficiently and professionally. e.g. Does not use offensive language or excessive slang in project communications.
      • Responds to communication from team members in a timely manner (e.g. within 24 hours).
    • Punctuality: Does not cause others to waste time or slow down project progress by frequent tardiness.
    • Dependability: Promises what can be done, and delivers what was promised.
    • Effort: Puts in sufficient effort to, and tries their best to keep up with the module/project pace. Seeks help from others when necessary.
    • Quality: Does not deliver work products that seem to be below the student's competence level i.e. tries their best to make the work product as high quality as possible within her competency level.
    • Meticulousness:
      • Rarely overlooks submission requirements.
      • Rarely misses compulsory module activities such as pre-module survey.
    • Teamwork: How willing are you to act as part of a team, contribute to team-level tasks, adhere to team decisions, etc. Honors all collectively agreed-upon commitments e.g., weekly project meetings.

    • No penalty for scoring low on competency criteria.

    Q The competency of the team member demonstrated in the project and during the tutorials,

    • Considered only for bonus marks, A+ grades, and tutor recruitment
    • Evaluated based on the following criteria, on a scale Poor/Below Average/Average/Good/Excellent:

    Peer Evaluation Criteria: Competency

    • Technical Competency: Able to gain competency in all the required tools and techniques.
    • Mentoring skills: Helps others when possible. Able to mentor others well.
    • Communication skills: Able to communicate (written and spoken) well. Takes initiative in discussions.

    Q [Optional] Any ANONYMOUS feedback you want to give the classmates you reviewed above?

    Q [Optional] Any CONFIDENTIAL comments about any team members?

    C Lecture attendance/participation not too low

    Low attendance/participation can affect participation marks directly (i.e., attended fewer than 7) or indirectly (i.e., it might result in low peer evaluation ratings).

    In addition, you can receive bonus marks in the following ways. Bonus marks can be used to top up your participation marks but only if your marks from the above falls below 5.

    • [For lecture participation] Participated in lecture activities (e.g., in lecture polls/quizzes) in at least 10 lectures: 1 mark
    • [For perfect peer ratings] Received good ratings for all 10 peer evaluations criteria: 1 mark
    • [For helping classmates] Was very helpful to classmates e.g., multiple helpful posts in forum: 1 mark

    Examples:

    • Alicia earned 1/2, 3/5, 2/5, 5/5, 5/5, 5/5, 5/5, 5/5, 5/5, 5/5, 4/5, 5/5 in the first 12 weeks. As she received at least half of the points in 11 of the weeks, she gets 5 participation marks. Bonus marks are not applicable as she has full marks already.
    • Benjamin managed to get at least half of the participation points in 9 weeks only, which gives him 5-1 = 4 participation marks. But he participated in 10 lectures, and hence get a bonus mark to make it 5/5.
    • Chun Ming met the participation points bar in 8 weeks only, giving him 5-2 = 3 marks. He lost 2 more marks because he received multiple negative ratings for two criteria, giving him 1/5 participation marks.

    Your participation progress can be tracked in this page from week 3 onward.

    Total: 20 marks

    Implementation [10 marks]: Requirements to get full marks:

    • Achieve more than 90% of all deliverables by the end.
      • Requirements marked as optional or if-applicable are not counted when calculating the percentage of deliverables.
      • When a requirement specifies a minimal version of it, simply reaching that minimal version of the requirement is enough for it to be counted for grading -- however, we recommend you to go beyond the minimal; the farther you go, the more practice you will get.
    • The code quality meets the following conditions:
      • Reasonable use of OOP e.g., at least some use of inheritance, code divided into classes in a sensible way
      • No blatant violations of the coding standard (both Java and Git conventions)
      • At least some errors are handled using exceptions
      • At least half of public methods/classes have javadoc comments
      • The code is neat e.g., no chunks of commented out code
      • Reasonable use of SLAP e.g., no very-long methods or deeply nested code

    Project Management [5 marks]: To get full marks, you should achieve,

    • Submit some deliverables in at least 3 out of the 5 iP weeks (i.e., week 2 - week 6)
    • Follow other requirements specified (e.g., how to use Git/Github for each increment) in at least 4 weeks

    Documentation [5 marks]: To get full marks, you should achieve the following.

    • The user guide: not hard to read, covers all features, no major formatting errors in the published view.
    • The developer guide: Explains the design of the project using appropriate UML diagrams and descriptions.

    You can monitor your iP progress (as detected by our scripts) in the iP Progress Dashboard page.

    Note that project grading is not competitive (not bell curved). Given below is the marking scheme.

    Total: 75 marks ( 65 individual marks + 10 team marks)

    See the sections below for details of how we assess each aspect.

    1. Project Grading: Product Design [ 5 marks]

    Evaluates:

    • how well your features fit together to form a cohesive product
      (not how many features or how big/novel/interesting/difficult the features are)
    • how well it matches the target user

    Evaluated by:

    • the teaching team (based on product demo and user guide)
    • peers from other teams (based on peer testing and user guide)

    Q Quality of the product design,
    Evaluate based on the User Guide and the actual product behavior.

    Criterion Unable to judge Low Medium High
    target user Not specified Clearly specified and narrowed down appropriately
    value proposition Not specified The value to target user is low. App is not worth using Some small group of target users might find the app worth using Most of the target users are likely to find the app worth using
    optimized for target user Not enough focus for CLI users Mostly CLI-based, but cumbersome to use most of the time Feels like a fast typist can be more productive with the app, compared to an equivalent GUI app without a CLI
    feature-fit Many of the features don't fit with others Most features fit together but a few may be possible misfits All features fit together to for a cohesive whole

    In addition, feature flaws reported in the PE will be considered when grading this aspect.

    Note that 'product design' or 'functionality' are not critical learning outcomes of the tP. Therefore, the bar you need to reach to get full marks will be quite low. For example, the Medium level in the rubric given in the panel above should be enough to achieve full marks. Similarly, only cases of excessive 'feature flaw' bugs will affect the score.

    These are considered feature flaws:
    The feature does not solve the stated problem of the intended user i.e., the feature is 'incomplete'
    Hard-to-test features
    Features that don't fit well with the product
    Features that are not optimized enough for fast-typists or target users

    2. Project Grading: Implementation [ 25 marks]

    2A. Code quality

    Evaluates: the quality of the parts of the code you claim as written by you

    Evaluation method: manual inspection by tutors + automated-analysis by a script

    Criteria:

    • At least some evidence of these (see here for more info)

      • logging
      • exceptions
      • assertions
      • defensive coding
    • No coding standard violations e.g. all boolean variables/methods sounds like booleans. Checkstyle can prevent only some coding standard violations; others need to be checked manually.

    • SLAP is applied at a reasonable level. Long methods or deeply-nested code are symptoms of low-SLAP.

    • No noticeable code duplications i.e. if there multiple blocks of code that vary only in minor ways, try to extract out similarities into one place, especially in test code.

    • Evidence of applying code quality guidelines covered in the module.

    2B. Effort

    Evaluates: how much value you contributed to the product

    Method:

    • Step 1: Evaluate the effort for the entire project. This is evaluated by peers who tested your product, and tutors.

    Q If the implementation effort required to create AB3 from scratch is 10, the estimated implementation effort of this team is, [0..20] e.g., if you give 8, that means the team's effort is about 80% of that spent on creating AB3. We expect most typical teams to score near to 10.

    • Do read the DG appendix named Effort, if any.
    • Consider implementation work only (i.e., exclude testing, documentation, project management etc.)
    • Do not give a high value just to be nice. Your responses will be used to evaluate your effort estimation skills.

    • Step 2: Evaluate how much of that effort can be attributed to you. This is evaluated by team members, and tutors.

    Q The team members' contribution to the product implementation (excluding UG, DG, and team-based tasks) is,

    • Baseline: If your team received a value higher than 10 in step 1 and the team agrees that you did roughly an equal share of implementation work, you should receive full marks for effort.

    3. Project Grading: QA [ 15 marks]

    3A. Developer Testing:

    Evaluates: How well you tested your own feature

    Based on:

    1. functionality bugs in your work found by others during the Practical Exam (PE)
    2. your test code (note our expectations for automated testing)
     
    • Expectation Write some automated tests so that we can evaluate your ability to write tests.

    🤔 How much testings is enough? We expect you to decide. You learned different types of testing and what they try to achieve. Based on that, you should decide how much of each type is required. Similarly, you can decide to what extent you want to automate tests, depending on the benefits and the effort required.
    There is no requirement for a minimum coverage level. Note that in a production environment you are often required to have at least 90% of the code covered by tests. In this project, it can be less. The weaker your tests are, the higher the risk of bugs, which will cost marks if not fixed before the final submission.

    These are considered functionality bugs:
    Behavior differs from the User Guide
    A legitimate user behavior is not handled e.g. incorrect commands, extra parameters
    Behavior is not specified and differs from normal expectations e.g. error message does not match the error

    3B. System/Acceptance Testing:

    Evaluates: How well you can system-test/acceptance-test a product

    Based on: bugs you found in the PE. In addition to functionality bugs, you get credit for reporting documentation bugs and feature flaws.

    Grading bugs found in the PE
    • Of Developer Testing component, based on the bugs found in your code3A and System/Acceptance Testing component, based on the bugs found in others' code3B above, the one you do better will be given a 70% weight and the other a 30% weight so that your total score is driven by your strengths rather than weaknesses.
    • Bugs rejected by the dev team, if the rejection is approved by the teaching team, will not affect marks of the tester or the developer.
    • The penalty/credit for a bug varies based on the severity of the bug: severity.High > severity.Medium > severity.Low > severity.VeryLow
    • The three types (i.e., type.FunctionalityBug, type.DocumentationBug, type.FeatureFlaw) are counted for three different grade components. The penalty/credit can vary based on the bug type. Given that you are not told which type has a bigger impact on the grade, always choose the most suitable type for a bug rather than try to choose a type that benefits your grade.
    • The penalty for a bug is divided equally among assignees.
    • Developers are not penalized for duplicate bug reports they received but the testers earn credit for duplicate bug reports they submitted as long as the duplicates are not submitted by the same tester.
    • i.e., the same bug reported by many testersObvious bugs earn less credit for the tester and slightly higher penalty for the developer.
    • If the team you tested has a low bug count i.e., total bugs found by all testers is low, we will fall back on other means (e.g., performance in PE dry run) to calculate your marks for system/acceptance testing.
    • Your marks for developer testing depends on the bug density rather than total bug count. Here's an example:
      • n bugs found in your feature; it is a big feature consisting of lot of code → 4/5 marks
      • n bugs found in your feature; it is a small feature with a small amount of code → 1/5 marks
    • You don't need to find all bugs in the product to get full marks. For example, finding half of the bugs of that product or 4 bugs, whichever the lower, could earn you full marks.
    • Excessive incorrect downgrading/rejecting/marking as duplicatesduplicate-flagging, if deemed an attempt to game the system, will be penalized.

    4. Project Grading: Documentation [ 15 marks]

    Evaluates: your contribution to project documents

    Method: Evaluated in two steps.

    • Step 1: Evaluate the whole UG and DG. This is evaluated by peers who tested your product, and tutors.

    Q Compared to AddressBoook-Level3 (AB3), the overall quality of the UG you evaluated is,
    Evaluate based on fit-for-purpose, from the perspective of a target user. For reference, the AB3 UG is here.

    Q Compared to AB3, the overall quality of the DG you evaluated is,
    Evaluate based on fit-for-purpose from the perspective of a new team member trying to understand the product's internal design by reading the DG. For reference, the AB3 DG is here.

    • Step 2: Evaluate how much of that effort can be attributed to you. This is evaluated by team members, and tutors.

    Q The team members' contribution to the User Guide is,

    Q The team members' contribution to the Developer Guide is,

    • In addition, UG and DG bugs you received in the PE will be considered for grading this component.

    These are considered UG bugs (if they hinder the reader):

    Use of visuals

    • Not enough visuals e.g., screenshots/diagrams
    • The visuals are not well integrated to the explanation
    • The visuals are unnecessarily repetitive e.g., same visual repeated with minor changes

    Use of examples:

    • Not enough or too many examples e.g., sample inputs/outputs

    Explanations:

    • The explanation is too brief or unnecessarily long.
    • The information is hard to understand for the target audience. e.g., using terms the reader might not know

    Neatness/correctness:

    • looks messy
    • not well-formatted
    • broken links, other inaccuracies, typos, etc.
    • hard to read/understand
    • unnecessary repetitions (i.e., hard to see what's similar and what's different)

    These are considered DG bugs (if they hinder the reader):

    These are considered UG bugs (if they hinder the reader):

    Use of visuals

    • Not enough visuals e.g., screenshots/diagrams
    • The visuals are not well integrated to the explanation
    • The visuals are unnecessarily repetitive e.g., same visual repeated with minor changes

    Use of examples:

    • Not enough or too many examples e.g., sample inputs/outputs

    Explanations:

    • The explanation is too brief or unnecessarily long.
    • The information is hard to understand for the target audience. e.g., using terms the reader might not know

    Neatness/correctness:

    • looks messy
    • not well-formatted
    • broken links, other inaccuracies, typos, etc.
    • hard to read/understand
    • unnecessary repetitions (i.e., hard to see what's similar and what's different)

    Architecture:

    • Symbols used are not intuitive
    • Indiscriminate use of double-headed arrows
    • e.g., the sequence diagram showing interactions between main componentsarchitecture-level diagrams contain lower-level details
    • Description given are not sufficiently high-level

    UML diagrams:

    • Notation incorrect or not compliant with the notation covered in the module.
    • Some other type of diagram used when a UML diagram would have worked just as well.
    • The diagram used is not suitable for the purpose it is used.
    • The diagram is too complicated.

    Code snippets:

    • Excessive use of code e.g., a large chunk of code is cited when a smaller extract would have sufficed.

    Problems in User Stories. Examples:

    • Incorrect format
    • All three parts are not present
    • The three parts do not match with each other
    • Important user stories missing

    Problems in Use Cases. Examples:

    • Formatting/notational errors
    • Incorrect step numbering
    • Unnecessary UI details mentioned
    • Missing/unnecessary steps
    • Missing extensions

    Problems in NFRs. Examples:

    • Not really a Non-Functional Requirement
    • Not scoped clearly (i.e., hard to decide when it has been met)
    • Not reasonably achievable
    • Highly relevant NFRs missing

    Problems in Glossary. Examples:

    • Unnecessary terms included
    • Important terms missing

    5. Project Grading: Project Management [ 5 + 10 = 15 marks]

    5A. Process:

    Evaluates: How well you did in project management related aspects of the project, as an individual and as a team

    Based on: tutor/bot observations of project milestones and GitHub data

    Grading criteria:

    • Project done iteratively and incrementally (opposite: doing most of the work in one big burst)

    • Milestones reached on time (i.e., the midnight before of the lecture) (to get a good grade for this aspect, achieve at least 75% of the recommended milestone progress).

    • Good use of GitHub milestones mechanism.

    • Good use of GitHub releases mechanism.

    • Good version control, based on the repo.

    • Reasonable attempt to use the forking workflow at least for the early part of the project.

    • Good task definition, assignment and tracking, based on the issue tracker.

    • Good use of buffers (opposite: everything at the last minute).

    5B. Team-tasks:

    Evaluates: How much you contributed to team-tasks

    Here is a non-exhaustive list of team-tasks:

    1. Setting up the GitHub team org/repo
    2. Necessary general code enhancements e.g.,
      1. Work related to renaming the product
      2. Work related to changing the product icon
      3. Morphing the product into a different product
    3. Setting up tools e.g., GitHub, Gradle
    4. Maintaining the issue tracker
    5. Release management
    6. Updating user/developer docs that are not specific to a feature e.g. documenting the target user profile
    7. Incorporating more useful tools/libraries/frameworks into the product or the project workflow (e.g. automate more aspects of the project workflow using a GitHub plugin)

    Based on: peer evaluations, tutor observations

    Grading criteria: Do these to earn full marks.

    • Do close to an equal share of the team tasks (you can earn bonus marks by doing more than an equal share).
    • Have your code merged in at least five of weeks 6, 7, 8, 9, 10, 11, 12